Tuesday 17 December 2013

evaluation of project ( horror project)

what went well


overall i think what went well in the entire project was mainly the designing and drawing part of the project and the creation of the level, first of all, i love drawing and so, the drawing, sketching and designing part was a breeze for me, it is hard to think of many different ideas, but after time went by as i was able to draw and sketch so many different things and come up with alot of ideas for my level, of course i decided on one, which brings me to how my level went well, it did take a very long time to create but over all i think my level was great, after everything had been created, i had a very easy time putting in textures and lighting to give it a more dramatic effect, also i knew alot of the detailed stuff, like creating animations for the doors, so this was a part that really went well ( the picture on the left is a birds eye view of the whole map of the level and on the right is just a screen shot of one of the main hallways in the level, basically showing you a glimpse of the lighting and texturing)

what was found difficult
what i found difficult was trying to do everything in such a small amount of time, i know we had 6 weeks to do the project but that is only 3 days a week, also trying to create a level which is finished and legit takes a very long time, as well so doing alot of design work takes a very long time, so these are the kind of things i found difficult, another difficult part was starting the level off and creating out the corridors, yes it was easy, but it took so damn long and kept messing up along the process.

encountering problems
the only problems i had encountered, was when i was creating my level, UDK decided to screw up alot so it took me a very long time to complete it, not only this but udk kept on not saving, it froze half way through the process, so again, it took me a while to finish, therefore because it took me a while, i didn't have enough time to texture the ceiling.


overcoming problems
i didn't really do anything special to overcome my problems, i just had to keep backing up my work, and working alot quicker due to the fact i had to work quicker, textures were unable to be put in places and also there where some parts of the level that where incomplete

what would i change if i did this project again
to be honest, i wouldn't really change anything from my project if i were to do it again, i really liked all the sketches and designs i could come up with, as well as the final concepts, i also really like how my level turned out, it came out just the way i wanted it and seeing as i have experience with the phobia i chose, it was easy to come up with something suitable, then again, i probably would change my time table so i am able to fit everything into the 6 week period equally and not have to rush at the end, that's all.

here are some more screen shots of my level, enjoy!
multiple path ways, this is located in the maze


kismet, you use this to create animations and such with matinee, for doors or figures etc
  second room- showing the dramatic lighting and door way


this is showing the beginning of the corridors and the open door.

feed back from level testing ( horror project)

after completing my gaming level on UDK, my level got tested by multiple people, however after they finished testing my level they had to answer some questions i had asked them, this is so i can get feedback on whether my level was good or not and what could be changed, also what i could improve on in the future, underneath i shall put down the questions with all the answers and then write on what i would improve on from my answers and also testing other game levels.

Q1: what key feature of the level was the best?
" The darkness in the corridors"
" the lighting, the player gets confused because they can't see etc"
" i liked that the level was in the form of a maze"
" the best part was simply how the level was not linear, and felt like a maze"
"the door opening  at the start"

Q2: what key feature of the level, was the worst?
"no textured ceiling panels"
"running into walls"
"could be a bit more tense"
"the areas where i had to do a slight jump to get through"
"i felt the textures were not seamless and didn't look realistic"

Q3: what would you change about the level?
"i would change the textures and the lighting as they are too repetitive"
"lighting"
"lighting, to make dark areas more visible"
"add materials to the ceiling"
"the doors on entry, trying to close when i stand on them"

Q4: does this level convey claustrophobia?
"yes, that was my initial thought, when i thought about the theme"
"in some ways yes, as the feeling of being trapped is present"
"yes, i think i went slightly mad when playing it"
"yes"
"yes"

Q5: did you like the idea of the level?
"yes"
"i thought it was really planned out"
"i like the claustrophobia maze idea of the level"
"yes"
"yes, although it can get frustrating"

Q6: if you were to create a level for claustrophobia, what would you do differently to what i did?
"tighter walls"
"i would make the narrowing of the corridors more obvious"
"would make the spaces narrower and taller"
"i would add spikes to the walls to make the player feel that they are going to be crushed"
"tighter corridors"

Q7 did you have fun?
"yes?"
"yes"
"yes"
"yes"
"yes ;D"


over all what people thought of my level was that it was a good level and it did convey the phobia of claustrophobia, which was my intention all along, i did get many comments from people saying that it was hard to find the way out, and they they kept giving up, which was a good sign, because claustrophobia is the fear of small spaces and the fact that you are unable to escape, of course some one as myself who has claustrophobia, would be very well known to this kind of stuff so i thought making a level i was quite knowledgeable on would be good.

the main things in which people said i needed to change or improve on my level was mainly the textures and the lighting, there were other things like doors and such, but the main one which came up alot was textures and lighting, because my level was really dark, however my level was SUPPOSE to be dark as it is a maze, you are not suppose to find your way out, as for texturing, i didn't manage to texture the ceiling so that is something i need to improve on, managing my time better so i can texture perfectly.

based off testing other levels which were created by other people, i think next time i shall improve on the texturing and the lighting to make things seem a bit more tense and eery, not only that but when playing the levels, people had cut scenes and elevators and all sorts of fancy things, so next time i should do some research on elevators, sounds, cut scenes etc to make my level better.

evaluation of the medias (horror project)

i had created a 6 panel drawing, using 6 different medias, alot of the medias i used where described on the last log book entry, with this 6 panel drawing i had created 6 images from my level, with the media and said how i found using them and if i liked them or not, or whether i'd use it again, in this log book i will simply say to go along with my drawing, "what didn't go well an why" and also "what will i use them for in the future"

what didn't go well and why

what didn't go well was the granite, the charcoal and the copic markers, first of all i have no idea how to use granite correctly as it was my first time using it, i merely used it like a thick pencil but didn't do well with using it, next was the charcoal, again, it was my first time using it, and so i had trouble trying to use it, charcoal is very messy and smudges easy, so therefore i found it hard to use, and it didn't go well, the last media was copic markers, i hate these things, yes they are good with creating a gradint-ish look on things, but when colouring in small areas, or anything in general, i find it hard to use, i do like the fact the marker has 2 different style tips but still, it is very hard to use in my opinion.

Uses in the future

pens and pencil : would definitely use this i the future, as i am used to pen and pencil i will mainly use this all the time for sketches and shadings, it's one of the easiest medias to use for me and so it will be most handy when sketching ideas and drafts

water colour: will probably be used always when having to research different medias, i love water colour and it i one of my favorite medias, i know i have to research OTHERS but  water colour will be one of the main ones i use for any paintings or further research in concepts and design.

Copic marker: i will use this rarely as i dislike this type of media, but i will use it mainly if i have to research about another media, or if i want to do a hard edge shading, that's what it is best for to me

digital: i will use this very often for designing and drawing, also for research into other medias, digital rt is very simple and easy to do for me and i do it on a daily basis, so like pencil and pen i will basically use it to sketch, design, and colour etc in the future.

charcoal: i will probably never use this again unless i wish to learn new techniques with shading and drawing, or if i need to research another media or use another media for my project.

granite: not much to say for this but i probably won't use this in he future, as i have no idea how to use it properly, some lengthy research would have to be done before i even consider using it.

different medias used in the project (horror project)

the different medias i'll be uing in this project is a big mix of things,  i will be using, of course traditional, which is pencil and pen, water colour paints, digital, charcoal, copic markers and  granite pencil ( only a bit)

Key attributes, what are they used for, How are they used.
the key attributes for any media is to help create something in which a person designs, they use this media DUE to its attributes, all medias have different uses and so they all help and do different things.

pencil/ pen: the main key attribute for a pencil is for sketching, seeing as pencils are so light (depending on how hard you press down) you can sketch anything, and also it can be easily erased if mistakes are made, pencils are also used for shading, pencils are very easy to shade with  as you can press down really hard, to letting it flow nicely across the paper to either create a hard shade, or a gradient shade.
for a pen, they are mainly used for writing, as using a pen to write is alot neater then anything else, also if you felt adventurous, a pen can be used to draw, if you are confident at making no mistakes then a pen is good for this.

water colour paints: the key attribute(s) for paints are basically... to paint, paints are well known to be good at mixing colours to get the correct shade you like and also blending and over doing, painting is a nice free form of media.  water colours is a type of paint you mix with ALOT of water, and with these yo can be as messy as  you like, especially when painting a certain image, you can start from a very light colour, going into the dark ones, being less messy as you go.

digital: very popular now, there are many different programmes which fit under the digital category, this media is of course, used for creating digital art, with digital art you can create a defined look on any art piece you probably couldn't do with other medias, digital art can be erased just like pencil, and you can sketch, colour messy and all sorts, just like the medias listed above, digital art is also known to be used in some game industries to create concept art in a very quick and neat way.

charcoal: charcoals key attributes are usually seen as charcoal being good for shading and creating tension in an image, due to it being easy to smudge and blend, it can create very good lighting techniques, and shading techniques, you can keep putting charcoal over charcoal until you reach the shade/ gradient/ lighting on an image you want. they can be used to create back grounds for concept art in game industries, with backgrounds, charcoal can create a specific kind of tension and wonder on the image to make it fit your desire.

copic markers: the key attributes for copic markers are they are basically for creating a certain type of gradient look in an image, starting with a very light shade you can build your way up to a darker shade. they are very useful for when building up an image from the lightest colour first to the darkest. like the other medias, they can be used for concept art,  lighting and shading effects

granite: like any normal pencil but can come in a much thicker size, especially like the one i used, it's attributes are for easy drawing and shading like the pencil, this can be used instead of pencil, but of course there are it's differences, such as if you use a much thicker pencil of granite it is alot harder to use.

Sunday 8 December 2013

researching artists (EXPLORE project)(OPEN project)

over the next 9 weeks i will be researching and going into great detail into finding out about an artist of my choice, i will be learning many things about such an artist, their type of art style, the way in which they create their art, and also present a piece of work with their style of work.

after looking at some artists and their different styles of work, the one that catches my eye the most, and the one that interests me the most is the artist known as: georgia o'keeffe. for her types of art she would paint/ draw close up of blossoms, present them close up to make it seem as if they were being seen through a magnifying lens, i believe this is so such detail could be seen and the colours which hide which usually can't be seen when passing by, when when looking up close, the beauty of it is shown, and art is created.

born:  November 15th 1887
died: march 6th 1986
from: America

has a "feminine nature" to her paintings
"mother of American modernism"

her specific style/ field in the art industry is mainly paint/oil and charcoal
in 1915, she started her career with drawing charcoal drawings, of, of course, close up blossoms, this is something in which she enjoyed creating, especially when they got put onto show.
her work were given the words "pure" "fine" "sincere" etc.


not also did she do charcoal, but also normal canvas paintings which where also very popular, such as this painting for example, which is called "the white flower" it is a very beautiful flower with alot of detail, did you know that it is known that all her painting are created due to the things she would find lying around in her studio, this would include not only her famous blossoms but also, bones and also landscapes. with her art she would create a series of images which would probably create one image or a collection of one type of image, " Certain works of hers went on for decades, and produced 12 or more variations, of the same image she had created in earlier pieces of art." "she had created her work in a series, and with many of her pieces a series within a series,"

it is said that georgias work (the flower paintings) where "highly sexual" as the resembled the female form in a very erotic way, she claimed she was not afraid to try new forms, shapes, colours or anything as such, as long as her art has shown an image in which she wanted, she would be satisfied, whether the outcome is sexual and erotic, or not.
this piece of art is an example of one of her erotic female form flower paintings, just by looking at it you can see the resemblance of the female sex organ, this is what people meant when they labeled her art as erotic, she chooses to paint flowers in a way such as this to try and present the female form as maybe something beautiful and can be seen in many different shapes and forms.


another art form in which Georgia used was erotic photography, posing in such ways it would seem erotic, but I'm sure her intentions of such art where not to be seen in a pornographic way but it more of a female symbol art way, she shows and represents her female body as if to say that she is proud of being female and that her body is artistic and must be shown to the world, just like a males body, seeing as they come in different forms and shapes, they must be shown with pride, so that is probably what she was trying to do with this type of art style.


game engines (horror project)

a game engine is a system, a system used for the development and creation for a video game, it can be both 3d and 2d graphics, used as a rendering engine, a physics engine or collision detection, sound, scripting, animation, artificial intelligence, networking, streaming, memory management, threading, localization support, and a scene graph.

Areas of game engines

graphics rendering
graphics rendering is basically, the game engine is drawing/creating, everything/ anything you'll be able to see in a game, rendering is a technical term for "coloring a design", basically saying, everything that has been made and put into a game engine for a game will then be rendered, aka, formatted into a much higher quality and a quality in which the game and frames of the game can handle, good graphics rendering is when you can see no stick out pixels, everything looks smooth and sleek, here you'll know that the rendering of the graphics has been preformed at a high quality within the game engine and used within the frame rate needed. a badly done rendering is (sort of like what you'd see many years ago with very very old games) is when it doesn't look high quality at all, and it looks quite messy, it can be used with a certain frame rate, but could cause graphic lag.

Animation systems
this could include "Unreal Development kit", however animations systems include many things, these things help in making moving images/ graphics/ objects and storing them in a games engine where they'd soon be used in a game.
the unreal engine is an example (UDK) the
animation system adds motion to rendered objects. "Bone animated meshes are called Skeletal Meshes. Unlike Static Meshes which can only be animated via Matinee, Skeletal Meshes have a set of bones to make up a skeleton. These bones are used to drive the motion of the mesh and placement of objects on a mesh. There are four parts to the animation system - playback of key framed animation data, blending of animations together, controlling bones and blending of morph targets." of course with animation systems there has to be a whole line of work which you'll have to go through different stages this is known as a "pipe line" which are mentioned above.
this is just one of the most known/ basic animations systems known, which is the unreal development kit, also being used in my project.


AI


also known as artificial intelligence, an AI is used to produce intelligence and such to non playable characters in games (NPC'S) an AI is usually centered around NPC's and good game play, collecting and holding in alot of information needed for the game to continue, this could include simple codes to make the game fair for players and keep power and level of the NPC's at an average if need be. also cheats are also held in by an AI, because you know some people can't play a game unless they have some sort of cheat code, due to this the AI is programmed and ready for an event such as this.
(extra information: some people may wonder why this image has been connected to the paragraph labelled AI , well just looking at it you can see lots of coding and scripting etc, something in which an AI has to store for their intelligence to be unique inside a game there for linked this image as it seems most fitting)


Physics 
physics in a video game are very important as they keep everything in order as they would in real life, for example, the physics of jumping, in real life you can jump only a few feet off the ground, so in games this would also be made like this or else the physics would be seen as unrealistic, of course if you are making a sort of fantasy game where you can do anything you want, physics will not apply, other physics would include collision on objects so you can't walk through everything, physics make games very stable and realistic and also fair to play, having no physics at all can make things very odd and difficult to work with, and so they are added into the game to make things easier and to give a better gaming experience ( could also include making sure all grounds are hard so no glitches make you fall through it or get stuck etc)
 
Sound
a game engine would not hold and process all of the graphics and physics, but also the sounds and music put into games, game engines make sure all music/sound stay to where they have been  programmed and are played with perfect timing, sound makes a game become more alive and so a game engine makes sure that the sound is made high quality and is processed with up most perfection before being put into a game ( seeing as sound travels as vibrations/ waves this picture seems most appropriate when trying to talk about sounds in game engines)

Different types of game engine

2D engines
2D game engines where used to create very simple but fun games, it may not look as stunning as 3D but the games made are still great, an example of a 2D game made,could be the very original PAC MAN, I'm
not sure if it was made by a game engine but it is merely an example,2D engines are like 3D they transfer graphics, sounds, etc however at a much quicker speed and lower rate, due to the fact there are only 2 dimensional graphics, text and models and frames in 2D engines

examples of 2d engines:
* Adventure Game Studio
* Construct Classic
* dreemchest
* flare
* ZenGL
these are just a few of many 2D game engines

3D Engines 
if i am correct 3D game engines are usually the type of engines which would make them games in which we see today, all graphics and pixels and frames are 3 dimensional, and they all look kind of realistic at some point, especially at this day and age, there are many examples of games which could have been created in a 3D engine, such as: halo, fable, elder scrolls etc. 3D engines carry a lot more information then 2D ones i think, due to the fact there is a lot more polygons in models and meshes, the sounds and soundtracks are usually updated to suit the area of a game in which you are in (also for 2D) and there would be alot more moving frames at different rates (picture is from fable as an example of the 3D graphics)

examples of 3d engines:
* UDK
* Ardor 3D
* Blender
* Cube
* Game play3D
* panda 3D
there are many many more!

Mobile engines
these are special types of engines which are used to store the information and data needed for games for your mobile phone, they won;'t hold as much data as the 3D or 2D engines for consoles as the games for those have alot more detail to them, mobile engines will hold everything your normal engine would hold, except alot less due to the low graphics so a phone can handle it, frame rate (not as high as normal engines can handle) sounds etc

examples:
* alien3D
* Android GL engine
* DX studio
* game Kit
* LGame
and there are many more! ( these where mainly just android mobile game engines)


Monday 2 December 2013

phobia collage (horror project)

a collage of phobias, phobias in which are included in my mind map in which i had created, the main phobia in which i am focusing on is claustrophobia, the fear of small/ tight spaces and unable to escape, so i have added many images in the middle of claustrophobia, all around that phobia are all the other phobias such as the fear of water, dark, needles, heights, spiders, snakes, i have added an equal amount of each phobia so it makes it fair, but added many more images for the phobia in which i want to focus on!

phobia mind map (horror project)


here is a mind map in which i created of well known/ popular phobias in the world ( slightly hard to see... sorry)the phobias include: the fear of:
* spiders
* small spaces (claustrophobia)
* heights
* public areas
* needles
* darkness/ night
* deep waters

the mind map is pretty self explanatory, it gives you all the common phobas, explains what they are and also the causes which could cause such a phobia, with these phobias i shall pick one for my level, and focus on all its details.

horror project introduction

for my next project i will be studying horror and with this i will be creating a level which will include one phobia of my choice, and so throughout the project i must research many different phobias, game engines, i must design and create my level and test the level, and write an evaluation, this will go over a 6 week period, just like the last project, this is alot like the other project especially with all the research and sketches i have to do for this project, except we will be using a different software known as UDK "unreal development kit" editor version! Enjoy!

Sunday 3 November 2013

Final model evaluation ( project log book)

this is the end of my project over the course i have designed and created my own 3D model of a weapon i have designed, over all i love it there are some bad points but also some good points of my 3D model

the good things of my model is it is one of a kind and it is also my first model, and for my first model i think it is pretty decent, the shape came out how i wanted it too i was able to make parts i thought i wouldn't have been able to create, the colours are decent, and over all i think it looks like the one i draw, for the evaluation of everything i have planned and written so far has been good, i think i have written quite alot in my past log books and evaluated and labeled many of my designs with some weird aspects to them, but that is what sci fi is all about right? i did find the 3d modeling to be very tough though as i have never used such softwares before
how ever i think that there are rooms for improvement such as the way i made the model, i need to find ways in which i can do things faster instead of going through every tab or menu, also the way in which it is made is slightly tacky, however that is due to the fact that i am a first timer at using MAYA so i do not yet understand it all properly which is something i will in the future, i need to add better textures especially to the ribbon to make it seem like it is actually fabric and not the same as the handle and blade also when it comes to evaluationg everything else i probably need to do alot more research when writing things about a certain topic or maybe finding images/illustrations which fits the purpose of the topic better

overall i think this project has been fun and i think my 3D model came out how i imagined it, it could have been better, but i'm still happy with all the work i have put into the designing, planning and creating.

modeling development screenshots (project log book)

this ill include screen shots and descriptions of the screen shots of the development of my 3D model which i have created.
firstly the blade, obviously i'm not good at making models so it looks slightly tacky but i was able to fix it up later. but by making the blade i just created a large but very thin torus (donut shape) and then selecting a few of the faces and deleting them, which then gave me a C shape object which i could then work with as the blade, i the proceeded to use the extrude tool to lengthen the part at the top slightly, it doesn't look great at the moment but i added some spikes to it and it looked fine. ( the smooth tool was used to make it look more rounded)
with the spikes, i placed down a cone and used the scale tool to get it to the exact height and thickness i wanted it i also altered the width, i also used the rotate tool to rotate them to a certain degree so that they would fit perfectly onto my blade and the move tool so i could move them into the perfect position,  on both the blade and spikes i used the toon tool (2014 version) to add the shine like texture


the bow pieces where made from a simple one face plane, i used a NURBS primitive for this one so i could easily mold it. i controlled the vertex of the plane and either pulled it down up or to other vertexes to create a bow like shape where it's out at the end, it in at the other side, i also bent it slightly so had more of a shape to it, i only did one then i duplicated it to create two and rotated and flipped the other, i used the toon/ textures tool to make it a nice elegant purple colour and gave it some shaded effect too.
to create the ribbon going around the handle, i used a Helix shape,i altered it to the right size, width, height, and the right amount of coils i wanted, i then used the scale and rotate tool to turn it in a way i wanted it and the scale tool to make it look more like it was twisting around the handle, which was just created out of a stretched cylinder, after i got it to how i liked it i used the texture/ toon tool to add colour to it to match the bow and also used the smooth tool to make it more ribbon like.

 the two purple parts at the top and bottom are just like the sphere at the top, they are just made of polygon primitive spheres, however for these ones i used the scale tool to squash them slightly and stretch them out to create that type of shape, then for the silver parts i used cylinders, using the scale tool again i was able to stretch and squash them to the right size, after this was done i used the toon/ texture tool to add colour and lighting. due to the fact that my weapon is mostly metal it should have a smooth texture to it. to make the black part in the middle is a little more complicated to explain i'm sure there is an easier way to create it but i did it the way i know i clicked space and then clicked the front view panel and pressed space once more to get onto it, at the top is a scroll down tab that could say polygons when you first open MAYA, click the one that says surfaces to continue on with the process or else it won't work
then go onto the top load of tabs and click create then EP Curve tool this will help with creating this shape ( obviously)
once i did that i did as it shows on the picture below, i drew a curve like the one shown just by clicking 3 points with the ep curve tool, it is a very simple tool and very easy to do, once i created the curve i hit the enter key then went to the tab which says surfaces at the top, when hovering over to it a drop down menu will appear and you click the first option there called "resolve"  and your curve turns into this: ---->
this is what it will look like when you are back on the normal camera, move this out the way and delete the curve then using the scale tool and scale it down to size like the picture all the way above like so:


<----

and that is how i created all the pieces to my weapon!


final 3D model ( project log book)

after many hours of working i was finally able to create my weapon as a 3D model, i have never create don before so i am not that good at creating things, but i did my best for my model and i think it turned out fine, here are a few pictures at different angles, as mentioned before in a previous log book, i disliked the colours of my weapon and so i decided to change them, for my model i changed the colours to a white/ silver colour, purple and black! enjoy


i was able to attempt to do the crescent moon shaped blade, i added the spikes and the sphere energy ball, the ribbon and bow is also included and the parts on the base also, i know the blade looks huge, but the blade is meant to be big. also when adding textures i made the sphere energy ball slightly transparent so it looks more like an energy light ball and not just a ball


here it is from another angle, i tried my best to make it look like my original drawing, however i did make this once before and all my work got deleted and i forgot how i did everything, so this is my second time making it without help and without any pictures to guide me

development of model idea (project log book)

i have chosen which idea from my 3 final concepts i will be doing, and in this i will be explaining every piece of the model in which i am going to create!
i chose to create my scythe/ staff weapon, it has a very interesting shape and it seems very fun to make it into a 3D model, i have never created a 3D model before so this will be new for me but it will also be a challenge!

so i will be going through each part of the weapon and include annotations with it or a paragraph which explains everything, however when scanning each individual picture it come out blurry and hard to see and read some of the annotations, so i decided to redraw them all on SAI an art program in which i use, and so these images may be very plain and colour less but i shall explain each one


this is for starters a very basic drawing of the first part of the blade as i said before i decided to use the crescent moon shaped blade from my dagger design because it is really interesting and cause alot more pain then any other kind of blade, due to the face this curves over things such as bones getting it stuck and harder to remove. i've also made it quite a thin blade near the inside to make an easier cut through skin. The spikes have not been added yet as this is just some simple sketches and annotations
this is the second part for my weapon, first of all the blade has been altered slightly adding a flick upwards at the top and a flick downwards at the base, just to give it a little more shape, plus i like this look better then the normal crescent shape, as the one before seemed a little boring, i have also added the energy ball also on the blade, of course seeing as it isn't coloured it looks very plain and 2d like, but that's what i want for now, it shows a basic shape for my weapon, the energy ball connected to the blade as said on my weapon designs adds more power and damage when the blade hits something ( for example, it instantly makes the blade more sharp and easier to cut through things)

here is the handle to my weapon, here it looks very short but if i were to draw it extremely long it would be difficult to me on how to draw it on an A4 sheet of paper, this is just what the basic form and shape is, the handle will be made of a strong metal so it doesn't break, and will have plasma running through it when the energy ball is connected to it. i added the ribbon just for an extra, as i love ribbons and things like that i decided to add it to the weapon to add my own extra flare! on the base a few parts which just add extra detail to this handle, also it has the button in which extends and shortens the handle, it can be hard to reach when the handle is extended, but you'll have to figure out an easy way in which you'll be able to reach it without getting attacked while doing so.


this picture is nothing special it is just a side ( or front) and top view of them weapon, using this will help me make this weapon into a 3D model because i'll know how everything should be on every side etc

this image includes everything, and even the spikes, these are just different camera angles.


3 final concepts ( project log book)

for my project i had to create 3 final concepts, and within these 3 concepts i had to use one to create as a 3d model! but that will all be explained later on in my project, for my 3 final concepts i decided to create a scythe/staff type weapon, a plasma gun and a communication device, with these i had to create them on 3 different medias, one with traditional tools such as pencil and pen, one with water colour paints and oils and the last one with photo shop!, there they are

Traditional
this my scythe/ staff weapon i know it says wand but ignore that. this scythe comes with a very long handle, a ribbon attacked to it as an accessory, a crescent moon shaped blade with a energy sphere attached and extras, i used alot of the things i put on my weapon ideas, such as on the crescent bladed dagger, i used the crescent blade shape for this weapon as i thought it'd be very interesting and odd looking, also with this when stabbing some one it could cause alot of damage, i chose the long handle with the twirling ribbon, sue to the face it can extend and shorten, for both short and long range! the bow for extra creativity, the base to add more detail is just something i added on, also it holds the button for the handle to extend and shorten, also i have added spikes to the blade to just add an extra kick, also not to forget the energy sphere which adds extra power!. with this weapon i'm not really a fan of the colours i have chosen for it so i may change the colours later one, but over all i really love this weapon i think it belongs in the sci fi genre and it is also something you don't usually see often

Water colour
this is my second weapon i created for my 3 final concepts, this is not a blade, it is a gun!, i got inspiration for the shape from the energy blade from halo. also from my weapon designs it is the shape of one of the axe head blades, i really liked the shape and i also like the fact you can attach it to your wrist, how ever since this is a gun it won't be a blade but yet it is still a metal like material, this gun shoots plasma and to activate it you must squeeze the handle, this gun is very strange though, one you squeeze the handle the gun will scan your DNA and blood and energy, it will then shoot plasma using your energy, using this could be harmful to you as it could weaken you alot, however the weaker you are the weaker the plasma shots will be.
on this gun i have designed it with runes, the runes will light up in plasma once it has connected to your write and scanned your body, it adds a nice look to the weapon and looks alot more sci fi like! it is very basic but i love it.


Photoshop
this is communication gem which i created on photo shop, i decided to give it a very simple design as it is a very simple object also, i don't want it to stand out too much!, this communication device comes in many colours but i decided to do this one red, this gem has the same shape and form as the energy gem which was put on my weapon design draft ideas, i decided to use that shape as it looked very unique and perfect for this type of item, the communication gem gets connected to your ear lobe and looks similar to an ear ring so it blends in with things and stays hidden, like the gun it will scan your DNA and energy and blood, and will use your energy and DNA in your brain to make it work, once it has scanned your body, the black line path in the middle will begin to light up from the top to the bottom, once it's finished, you know it's working, in order to communicate people, those you wish to communicate must also have this gem and also you must have knowledge of them in your mind or else you can not communicate with them, it is a very difficult thing to work and very complicated but thats how it works, and just like the gun, do not use this ALOT or else you will become weak, because this will drain your will power

sci fi mindmap (project logbook)

this is my mind map of initial ideas for my sci fi project ( i did create a mind map in my sketch book, but as scanning it didn't come in handy, i recreated it) there are not many ideas on here, but there are enough to help me with my final design to come! i did some research and tried to come up with some things which link into sci fi, also i thought of the things i loved which linked to sci fi so i can use things in which give me inspiration to help me with my project, i thought of things like different types of sci fi such as steampunk, sci fi which is included in different games or tv shows or even movies which i enjoy and which interest me, so i noted down things like halo, dead space, starwars, DR who etc. i got a little confused on a few of the ideas.

Geometric theory ( project log book)

geometric theory is basically an approach to modeling objects by using surfaces and polygons or other things such as lines, vertices, curves and edges, faces and meshes etc, this theory can be used within the gaming industry or film industry to make 3d like graphics and objects which are seen quite alot this day and age. ( most of this information on this essay has been researched)

The use of 3D  within the interactive media industry and how 3D graphics are displayed


reference
a reference to using 3D modeling in a media industry could be a game such as some of the new legend of zelda games such as twilight princess, but lets compare this to one of the other 3d model like games which is ocerina of time, because the way in which they have been built into 3d models is very different.

as you can see here the model of link has a very low polygon rate (?) there isn't much detail in this model due to it being a very old game ( made in 1998?) also as you can see the texture given to the model seems very low quality and gives hardly any detail, so it doesn't give you a clear idea of what material everything should be, so as you can see the mesh for this model is very low quality and the polygon rate is low too, even though many faces and vertices and lines have been used to make this, using even more would have been able to add more detail which would make this model look alot better and less blocky or pointy
( the hair looks very flat due to low amount of faces used and also the clothes looks very thin and texture less) it is still a very well made model though.
this model of link is from twilight princess, a game in which was made not long after ocerina of time, but yet you can see the amount of change that has gone though this model and the other one, the mesh of this model looks alot smoother, the polygons don't look all flat and pointy, they have included so many polygons and faces that it looks smooth and realistic, also the texture in which has been added here makes the clothes look more realistic also, you can tell that he is wearing a rugged type of fabric for his tunic, he has leather boots and you can also see the shine and detail on his metal sword and shield, this is the amount of difference which can happen once more texture, faces and polygons have been added to a model mesh.


3D software used in industries!
there are many types of 3d software used in many different media industries! there are too many to name them all so i shall give some examples especially the ones in which i am familiar with:
first of all there is MAYA it is currently used in the film, television, and gaming industry.it is a 3D modeling software (obviously) where you begin with a simple plain and objects which you can then mold and sculpture into new shapes, maya has developed over the years giving us more to use making our models come out in a better form and shape!
Z BRUSH is also one i know of which is used as a digital sculpting and animation tool that combines 3D/2.5D modeling, texturing and painting. it is easy and fun to use and so quite a few industries must use this
from research  i found these other types of modeling softwares
* 3Ds max - used in film, television, video games and architecture "it is a 3D computer graphics program for making 3D animations, models, and images. It was developed and produced by Autodesk Media and Entertainment."
* animation master  - usually used for character animation but its modeling tools are for easy access and so used by many industries

* cinema 4D - this is usually used in the film industry for motion graphics and visuals!
* Electric Image Animation System - mostly known for it's rendering capability, this is not a built in modeling system but more for rendering
* form*Z - is a solid/ surface 3D modeler! it includes 3D modeling and realistic photo rendering, perfect for game industries or film
* inventor - is for 3D mechanical design, product simulation, tooling creation, and design communication.
* light wave - usually used in the TV industry to create effects and CGI for their programming ( can also be used in the film industry)
* mud box - is a high resolution brush-based 3D sculpting program, kind of like Z brush which was mentioned earlier!
* sketch up - another 3D modeling software which includes 2D as well as 3D
* blender - 3D studio for animation, modelling, rendering, and texturing unlike the other programs i think this one if Free to get, well unless you're a student some of these are free also
* mesh lab  - used to convert 3D mesh's into formats! also free!
and the list goes on!

construction and display of simple forms in 3D space 

polygon: polygons are plane figures used to create models, the more there are the smoother a mesh will become, they are a 2 dimensional shape, but with many put together it can create a 3 dimensional shape, using the vertices, edges and faces of each individual polygon or a selected few, you can alter the shape and create anything you like. ( you can see many polygon faces on here) all objects made in geometric theory 3d modeling are made using polygons

smoothing and extrude
extrude: This technique of 3D modelling is where you can change the objects length or width from any face of the 3D object. it is basically an easy way to model a shape into something you want easily, it can be hard to use at first though, this is a way to help construct a 3D form
smoothing : smoothing removes all jagged edges and makes everything look neat and clean, also by smoothing out a mesh/ object, it adds more faces and polygons to it, making the object more detailed, this could also be used to add realism into your object in which you have constructed.

Texture 
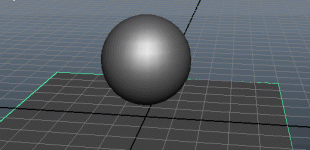
 texture is something in which would make the display of a simple form look technical, it can add shadow, light or material looking lighting to your object to add a realistic look to things, this will help in the construction of a model. ( you can see the shadow and light added to this very simple form)

move, rotate and scale tools are also used in the construction of very simple forms of 3D shapes for geometric theory, these are just very basic tools which can help you every day modeling especially with simple models.?

Mesh construction techniques 
box modeling - is a technique used to get the basic shape of a piece of work/ model in which you are creating, it is created out of basic shapes such as cubes, cuboids or cylinders  it is basically just a "draft" of your work and to help you decide on how to actually create your model

Extrusion modeling - the model starts off to be something small which could be a polygon, or an edge, or even just a point—and the person which start to model works out wards, using extrusion and other tools to build upon it and create the form in which they want.

Displaying 3D objects
Direct3D is used to render three dimensional graphics in applications where performance is important, such as games.it also allows applications to run full screen instead of a small window, though they can still run in a window if programmed for that feature! direct3D is very advanced and used for many different game consoles such as XBOX for example, it allows things such as video mapping and different types of overlay planes to be processed through and used easily in a high quality form! reason on why alot of things we see are in such good quality is due to rendering and processing software's such as direct3D
OpenGL: this is used for rendering 2D and 3D computer graphics it has a multi platform programming interface, it is used in many different things and many different industries use this to render their 3D objects onto such things like games it is usually used in things such as virtual reality, scientific visualization, flight simulation, and other things to do with video games!.
game engines: is a system designed for the creation and development of video games. these game engines are used for most things that we use today such as mobile phones/devices, computers, video games and consoles! it is also used like the others to render 2D and 3D graphics or models for games  the things in which are usually rendered into a game engine could include sounds, sights, scripting, animation, networking etc also used to help port games to different platforms.

pre rendered vs real time rendering
pre rendered: "The term per-rendered describes anything that is not rendered in real-time"
"the process in which video footage is not rendered in real-time by the hardware that is outputting or playing back the video. Instead, the video is a recording of a footage that was 
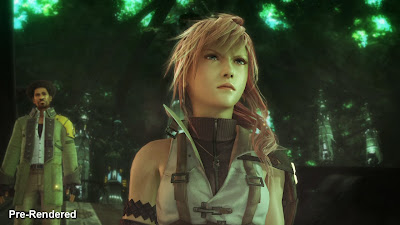
previously rendered on a different equipment" pre render is usually used in cut scenes in games, and so the shading textures and polygon count is alot different to real time rendering, of course the pre rendered timing is alot slower then real time rendering, due to this rendering belonging to a game, an example would be final fantasy 13, it is quite hard to see how many polygons are included in this one frame but i'm sure there would be thousands due to the amount of detail, but also in this one frame you can see the shading and the lighting easily, ofcourse through different frames it'll change slowly ( not too slow) because it is pre rendered, and also the textures too of the clothing,hair and skin will change through the different frames and different rates

real time rendering :  "is one of the interactive areas of computer graphics, it means creating synthetic images fast enough on the computer so that the viewer can interact with a virtual environment" real time rendering is very very fast as said above it is fast enough for the viewer to interact with the virtual environment,  the polygon count must be over thousands and thousands to create every single frame in the short amount of time of real time rendering! the texturing looks very realistic and so due to real time rendering and the fast frame rates it will stay to look like this throughout the interaction, the shading and lighting also due to the fast rendering time, the shading and lighting will change quickly too and continue to look realistic
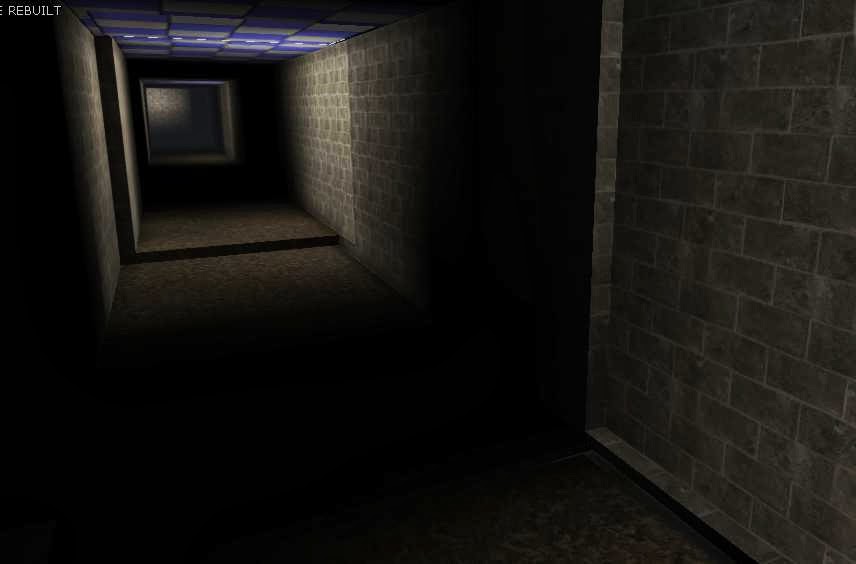


Friday 1 November 2013

weapon designs ( project log book)

for my project i have to create designs and a finalized design that relate to sci fi, due to the fact i love to do weapons i decided to draw up weapons for my designs, but before i finalize anything i need drafts and designs, below are weapon designs which will later be developed into bigger things, who know i may even use some of these weapon designs to make things which aren't even weapons

when scanning the weapon designs, i had trouble reading the writing which was written, so i recreated the designs and text, i will supply them with the originals!