this ill include screen shots and descriptions of the screen shots of the development of my 3D model which i have created.
firstly the blade, obviously i'm not good at making models so it looks slightly tacky but i was able to fix it up later. but by making the blade i just created a large but very thin torus (donut shape) and then selecting a few of the faces and deleting them, which then gave me a C shape object which i could then work with as the blade, i the proceeded to use the extrude tool to lengthen the part at the top slightly, it doesn't look great at the moment but i added some spikes to it and it looked fine. ( the smooth tool was used to make it look more rounded)
with the spikes, i placed down a cone and used the scale tool to get it to the exact height and thickness i wanted it i also altered the width, i also used the rotate tool to rotate them to a certain degree so that they would fit perfectly onto my blade and the move tool so i could move them into the perfect position, on both the blade and spikes i used the toon tool (2014 version) to add the shine like texture
the bow pieces where made from a simple one face plane, i used a NURBS primitive for this one so i could easily mold it. i controlled the vertex of the plane and either pulled it down up or to other vertexes to create a bow like shape where it's out at the end, it in at the other side, i also bent it slightly so had more of a shape to it, i only did one then i duplicated it to create two and rotated and flipped the other, i used the toon/ textures tool to make it a nice elegant purple colour and gave it some shaded effect too.

to create the ribbon going around the handle, i used a Helix shape,i altered it to the right size, width, height, and the right amount of coils i wanted, i then used the scale and rotate tool to turn it in a way i wanted it and the scale tool to make it look more like it was twisting around the handle, which was just created out of a stretched cylinder, after i got it to how i liked it i used the texture/ toon tool to add colour to it to match the bow and also used the smooth tool to make it more ribbon like.

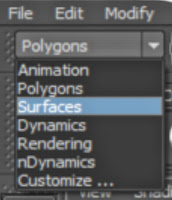
the two purple parts at the top and bottom are just like the sphere at the top, they are just made of polygon primitive spheres, however for these ones i used the scale tool to squash them slightly and stretch them out to create that type of shape, then for the silver parts i used cylinders, using the scale tool again i was able to stretch and squash them to the right size, after this was done i used the toon/ texture tool to add colour and lighting. due to the fact that my weapon is mostly metal it should have a smooth texture to it. to make the black part in the middle is a little more complicated to explain i'm sure there is an easier way to create it but i did it the way i know i clicked space and then clicked the front view panel and pressed space once more to get onto it, at the top is a scroll down tab that could say polygons when you first open MAYA, click the one that says surfaces to continue on with the process or else it won't work
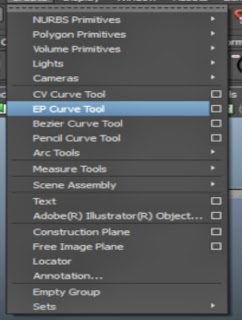
then go onto the top load of tabs and click create then EP Curve tool this will help with creating this shape ( obviously)
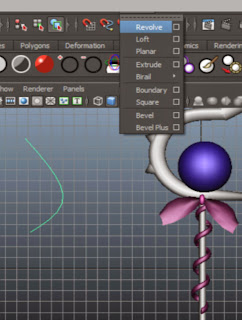
once i did that i did as it shows on the picture below, i drew a curve like the one shown just by clicking 3 points with the ep curve tool, it is a very simple tool and very easy to do, once i created the curve i hit the enter key then went to the tab which says surfaces at the top, when hovering over to it a drop down menu will appear and you click the first option there called "resolve" and your curve turns into this: ---->
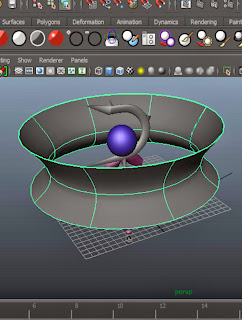
this is what it will look like when you are back on the normal camera, move this out the way and delete the curve then using the scale tool and scale it down to size like the picture all the way above like so:
<----
and that is how i created all the pieces to my weapon!


 the two purple parts at the top and bottom are just like the sphere at the top, they are just made of polygon primitive spheres, however for these ones i used the scale tool to squash them slightly and stretch them out to create that type of shape, then for the silver parts i used cylinders, using the scale tool again i was able to stretch and squash them to the right size, after this was done i used the toon/ texture tool to add colour and lighting. due to the fact that my weapon is mostly metal it should have a smooth texture to it. to make the black part in the middle is a little more complicated to explain i'm sure there is an easier way to create it but i did it the way i know i clicked space and then clicked the front view panel and pressed space once more to get onto it, at the top is a scroll down tab that could say polygons when you first open MAYA, click the one that says surfaces to continue on with the process or else it won't work
 then go onto the top load of tabs and click create then EP Curve tool this will help with creating this shape ( obviously)
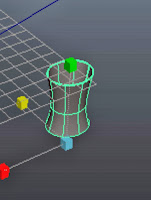
 once i did that i did as it shows on the picture below, i drew a curve like the one shown just by clicking 3 points with the ep curve tool, it is a very simple tool and very easy to do, once i created the curve i hit the enter key then went to the tab which says surfaces at the top, when hovering over to it a drop down menu will appear and you click the first option there called "resolve" and your curve turns into this: ---->
 <----
<----
No comments:
Post a Comment